Showing posts with label tutorial. Show all posts

Sunday, March 15, 2009

Tips for Ts

I have had some people ask for ideas, so...

Here are some tips for making GREAT Treasuries on Etsy!
  • 1. Decide on your Category - but don't be afraid to think outside the box. For instance, you may want "Cats" but you may also want to try searches of "Feline," "Tigers," "Kittens," "Stuffed," "Toy," etc. You may want to have a category within a category... perhaps items of Kittens with Blue in them. Narrowing it down more will give your T cohesiveness.

    You might want to have a variety of items (for instance, a piece of jewelry, a painting, a cloth apron, etc.) or you may want to keep it to ONE type of item (example, blue stuffed toy kittens). Don't forget to include the team tag in your search criteria if you want items from a team you are on... but don't get a huge guilt trip if you find great items for your theme and they aren't from your team! Just make your T beautiful and fun!

  • 2. Decide on your Title - this way when a T comes open, you aren't suprised, flustered, or unprepared. Be clever! Think of an alternate way to say what you want. Blue toy kitten example: "Mews with the Blues"

  • 3. Have a Method - I do my search, then go to the last page, because those listings have usually been up longest and would appreciate the exposure. Then I skip the last page or two, because these listings can actually expire before you are able to get a T or T West. I work forward using odd pages only, then if I haven't filled my 16 item quota (12 for the T plus alternates), work back through on the even pages.

  • 4. AND THIS IS IMPORTANT! Probably actually the first rule of Ts! ONLY choose listings with EXCELLENT, EXCEPTIONAL PICTURES!! Look for things like an attractive but not distractive background, a close-in shot of the item (even at an odd angle), beautiful lighting, and true color. One way you can tell if the color is true is to look for a "white" in the picture and see if it really is white.

    I have been known to write (politely) to an artist and say, "I am hearting items for an upcoming Treasury, and would LOVE to include your item, but the picture is a little fuzzy. Is there a way you can retake the main picture?" or, "your third listing picture is more attractive visually, can you rearrange them?"

    Even if I really LOVE an item, I will pass it by if the photography stinks.

  • 5. Heart the items for your T. If you are going to include an item (or two!) from your own shop, don't forget to leave yourself a couple "spaces." Have a new tab or window with your favorites open and refresh it from time to time to keep count of what you have going.

    I go to my shop, then open Favorites from there. It will come up with a 12-item gallery almost like your Treasury. Even if you are going to put some of those items as alternates, and items from the next page in the T itself, you will still get an idea of what it will look like and where you want to put items in your layout.

  • 6. Make a great layout! If you have items with dark backgrounds and items with light backgrounds, alternate them... Light, dark, light or vice versa. Or a "busy" picture, a calm one, a busy one. If some of your listings have a dominant color in commmon, put them in a row or down the middle of the T to draw the eye down. Most Treasuries, the items in the first two rows will get more clicks than the 3rd and 4th row... so arrange items so that they draw the viewer down to look at ALL the rows!

  • 7. Make a comment... let people know WHY you chose this treasury. Make them interested! Don't forget to click! Even as curator, you are allowed 12 clicks that count. which leads me to number 8...

  • 8. Spread the word! As I click on each item once my T is made, I then go to the Contact link and let the artist know they are in my T. A simple message that can be copied and pasted in for each listing, something like this:

    I have just included your item in my Treasury [West]. Please visit, click on items, and comment, to see if we can make the front page! Thanks!
    http://www.etsy.com/treasury_list.php?room_id=45806
    Then post to your team's forum or yahoogroup, or both. If you blog, blog about it and provide a link to your Treasury. I have Gadwin PrintScreen software, so I can take a screen shot, crop it in my graphics program, and post it on the blog. If you use F11 on the keyboard, it will disappear your tool bars and headers so you get the whole T on the screen at once.
  • Thursday, January 29, 2009

    Squaring-up Tutorial and stuff

    A friend of mine mentioned that she LOVES to quilt but HATES to square up. So do I, but I have found through painful experience that it is a necessary evil to those of us who like our quilts to match up. So I have provided here a short tutorial on it. Click pictures for full-size to make captions readable. Use your "back" button to come back to read the rest!


    Whatever your size block is supposed to be finished, you will need to add 1/2" to it, to account for seam allowances. For instance, a 6" block in a quilt squares up to 6.5". Most things that need to be squared will have a diagonal line in the block (though not necessarily). Find what measure the center point of your block would be found at... using our example of squaring to 6.5", the center point would be 3.25". (These hourglass blocks are being squared to 3.5", so the center point shown in the pics is 1.75".) Put the center of your actual block at the center point of the size the block should be.


    Put one corner of your ruler at the beginning point of your block. (I line up the diagonal line from the center measure to the top right corner. If you are left-handed you would put it at the top left corner.) Then be sure your other corners will cross the diagonal of your block at the finished squaring measure on the ruler... 6.5 inches down and 6.5 inches wide and the point where both 6.5 inch measurements meet (mine shown are at 3.5" at all points). Cut up the side and across the top, guiding the rotary cutter AWAY from your body and keeping your fingers OUT of the way!!


    Pick up the ruler... rotate the block 180 degrees so that the two UNCUT edges are by the hand you cut with and across the top. Once again line up your center point and outer corner points with the measurement you want the block to be. Cut again, up the side and across the top, guiding the cutter as before and keeping your fingers AWAY from the cutter! TADA!! Perfect little units for your quilting pleasure!


    And on that note, here is my block for today. Ain't it cute?


    Also, I messed with my drum carder more tonight. Well actually we did a LOT of other things today but I am giving you the Reader's Digest version because I want to go to bed! LOL! Anyway, remember that roving that I overdyed with black the other day, and I said I think it is the character Joe Morelli in the Stephanie Plum novels? Well I decided that instead of spinning it from the roving and having random little sections of color, I would card it and see what I got. I have an opinion, but I am taking votes. Which do you like better? The roving or the carded batt? Leave a comment! Thanks!

    Wednesday, November 26, 2008

    CHOCOLATE DECADENCE

    Credit
    This recipe is from the ultimate dessert cookbook, Cocolat, by the owner of the restaurant of the same name, Alice Medrich. It is out of print. I looked for a copy for nearly 10 years, and the one I finally got cost over $80. If you are serious about baking gourmet-style desserts, it is worth the search. And the money.

    This cake will cost (depending on where you live) about $12 to make, plus the raspberry or orange sauce. It is WORTH EVERY PENNY. If the people you serve it to don't swoon in ecstasy, RUN AWAY from those people! Next time serve them the instant pudding topped with oreo crumbs and cool whip, that they deserve.

    Ingredients
    for cake:

  • 1 POUND of dark (semisweet or bittersweet) chocolate, chopped up small
  • 5 oz (1 stick plus 2T) unsalted BUTTER (NO substitute)
  • 5 large eggs, separated
  • 1 Tablespoon flour
  • 1 Tablespoon sugar
  • pinch of Cream of Tartar, or 1 teaspoon vinegar
    a word about the chocolate: Use the best chocolate you can afford. Ghirardelli or even [gasp!] Nestle chocolate chips or chunks are okay... generic imitation chocolate-flavored chips are not. Your dessert will only be as good as what you put in it.

    for topping:
  • 3 to 4 cups whipping cream (NO substitute)
  • 3 Tablespoons sugar
    for sauce :
  • one small jar of Seedless Raspberry Jam or Orange Marmalade
  • 1 ounce (+/-) water

    Preheat oven to 425 degrees F

  • Trace your baking pan onto waxed paper or baking parchment. Cut the shape out. Grease baking pan (or spray with baking spray), line with cutout paper, grease or spray the paper too. Set aside.
    Preparing the pans
  • Separate egg whites into large grease-free bowl. In order for whites to whip properly, the bowl must have NO trace of oils in it, not even fingerprints!
  • Place yolks into a small cup.Separating eggs
  • In a large, microwave-safe measuring cup or bowl, melt chocolate with butter. 2 minutes should do it. Stir until the chocolate mixture is smooth. Alternatively if you don't own a microwave, you can melt the butter and chocolate in a bowl set over barely simmering water in a pan on the stove. Be sure not to get a *single* drop of water in the chocolate if you do it this way! It will ruin the chocolate!
    Melting and mixing the chocolate
  • Add the flour and egg yolks (yolks ONLY!) to the chocolate. Stir until blended in, and set aside. (Note, I am using 6 eggs because they are medium size)
  • Add a pinch of Cream of Tartar or a teaspoon of vinegar to your egg whites. Beat whites with a mixer (or whisk by hand if you are brave!) until soft peaks form. As the whites are beating, sprinkle in the Tablespoon of sugar. Continue beating until stiff peaks form and whites look smooth and glossy... and not a second more!
    Beating egg whitesCaption: Yes, I am a "po" woman with a "cadillac" mixer. A person who uses tools on a daily basis should own high-quality tools. I cook a lot for a lot of people!
  • fold about 1/4 of the beaten eggs into the chocolate mixture to lighten it.
  • Add chocolate mixture back to egg whites and fold in gently and continually until mixed.
    Adding beaten egg whites to chocolate
  • Pour into prepared pan.
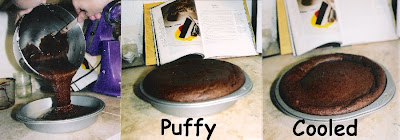
  • Bake exactly 15 minutes. Cake will rise almost like a souffle and will seem unset in the middle. This is correct!
  • Cool cake in pan. Cake will sink in the center and seem cracked around the edges. This is also correct!
    Cake in various stages of cooling
  • When cake is cool, run a knife around the edge. Invert cake onto your flattened hand, peel paper off the bottom, and place cake on a large serving plate or platter.
  • Topping the cake
    I see your wheels turning! You are thinking, "I could just SKIP this step and go straight to Cool Whip!" DO NOT even THINK about desecrating the sanctity of this cake with Cool Whip! I will hunt you down like the dog that you are, and cover you with that fake sweet fatness and tie you naked and "whipped" to an ant mound! I swear!

    When whipping cream, have the cream as cold as possible. It also helps to chill the bowl and whisk or beaters!

  • Pour whipping cream into the bowl and whisk or beat on low ro medium speed until soft peaks form. (If you use a higher speed, you can turn the cream into butter! No REALLY! What do you think butter is?)
  • Gradually sprinkle in 3 Tablespoons of sugar, as you are beating the cream.
  • STOP beating AS SOON as stiff peaks form. The whipped cream will stiffen further as you spread it on the cake. If you overbeat cream, it will curdle and get watery. Blek!
  • Spread about 3/4 of the whipped cream on the cake and over sides.
  • Put the rest of the cream into a pastry bag with large star tip and pipe on top of the cake. Or plop the rest of the cream around on the cake with a spoon and use the back of the spoon to make peaks.
  • Cake topped with Raspberry sauce

    Raspberry or Orange Syrup

  • Scoop contents of the jar of jelly into a large, microwave-safe measuring cup. Add 1 oz. of water and nuke a minute or two. Stir briskly to thin the sauce. Serve drizzled over the slices of cake.
  • I cut this cake into 24 slices (1/4, then each 1/4th into 6 very thin slices). When you have a piece, you will see why. It is incredibly rich. Oh and you can inform your low-carb friends that this cake has only ONE tablespoon of sugar and ONE tablespoon of flour in it.