Credit
This recipe is from the ultimate dessert cookbook, Cocolat, by the owner of the restaurant of the same name, Alice Medrich. It is out of print. I looked for a copy for nearly 10 years, and the one I finally got cost over $80. If you are serious about baking gourmet-style desserts, it is worth the search. And the money.
This cake will cost (depending on where you live) about $12 to make, plus the raspberry or orange sauce. It is WORTH EVERY PENNY. If the people you serve it to don't swoon in ecstasy, RUN AWAY from those people! Next time serve them the instant pudding topped with oreo crumbs and cool whip, that they deserve.
Ingredients
for cake:
1 POUND of dark (semisweet or bittersweet) chocolate, chopped up small 5 oz (1 stick plus 2T) unsalted BUTTER (NO substitute) 5 large eggs, separated 1 Tablespoon flour 1 Tablespoon sugar pinch of Cream of Tartar, or 1 teaspoon vinegar
a word about the chocolate: Use the best chocolate you can afford. Ghirardelli or even [gasp!] Nestle chocolate chips or chunks are okay... generic imitation chocolate-flavored chips are not. Your dessert will only be as good as what you put in it.
for topping: 3 to 4 cups whipping cream (NO substitute) 3 Tablespoons sugar
for sauce :one small jar of Seedless Raspberry Jam or Orange Marmalade 1 ounce (+/-) water
Preheat oven to 425 degrees F
Trace your baking pan onto waxed paper or baking parchment. Cut the shape out. Grease baking pan (or spray with baking spray), line with cutout paper, grease or spray the paper too. Set aside.
 Separate egg whites into large grease-free bowl. In order for whites to whip properly, the bowl must have NO trace of oils in it, not even fingerprints!Place yolks into a small cup.
 In a large, microwave-safe measuring cup or bowl, melt chocolate with butter. 2 minutes should do it. Stir until the chocolate mixture is smooth. Alternatively if you don't own a microwave, you can melt the butter and chocolate in a bowl set over barely simmering water in a pan on the stove. Be sure not to get a *single* drop of water in the chocolate if you do it this way! It will ruin the chocolate!

Add the flour and egg yolks (yolks ONLY!) to the chocolate. Stir until blended in, and set aside. (Note, I am using 6 eggs because they are medium size) Add a pinch of Cream of Tartar or a teaspoon of vinegar to your egg whites. Beat whites with a mixer (or whisk by hand if you are brave!) until soft peaks form. As the whites are beating, sprinkle in the Tablespoon of sugar. Continue beating until stiff peaks form and whites look smooth and glossy... and not a second more!
 Caption: Yes, I am a "po" woman with a "cadillac" mixer. A person who uses tools on a daily basis should own high-quality tools. I cook a lot for a lot of people! fold about 1/4 of the beaten eggs into the chocolate mixture to lighten it. Add chocolate mixture back to egg whites and fold in gently and continually until mixed.
 Pour into prepared pan. Bake exactly 15 minutes. Cake will rise almost like a souffle and will seem unset in the middle. This is correct! Cool cake in pan. Cake will sink in the center and seem cracked around the edges. This is also correct!
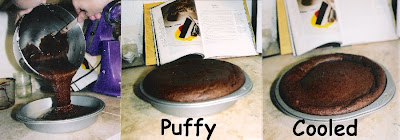 When cake is cool, run a knife around the edge. Invert cake onto your flattened hand, peel paper off the bottom, and place cake on a large serving plate or platter.
 Topping the cake
I see your wheels turning! You are thinking, "I could just SKIP this step and go straight to Cool Whip!" DO NOT even THINK about desecrating the sanctity of this cake with Cool Whip! I will hunt you down like the dog that you are, and cover you with that fake sweet fatness and tie you naked and "whipped" to an ant mound! I swear!
When whipping cream, have the cream as cold as possible. It also helps to chill the bowl and whisk or beaters!
Pour whipping cream into the bowl and whisk or beat on low ro medium speed until soft peaks form. (If you use a higher speed, you can turn the cream into butter! No REALLY! What do you think butter is?) Gradually sprinkle in 3 Tablespoons of sugar, as you are beating the cream. STOP beating AS SOON as stiff peaks form. The whipped cream will stiffen further as you spread it on the cake. If you overbeat cream, it will curdle and get watery. Blek! Spread about 3/4 of the whipped cream on the cake and over sides. Put the rest of the cream into a pastry bag with large star tip and pipe on top of the cake. Or plop the rest of the cream around on the cake with a spoon and use the back of the spoon to make peaks. 
Raspberry or Orange Syrup
Scoop contents of the jar of jelly into a large, microwave-safe measuring cup. Add 1 oz. of water and nuke a minute or two. Stir briskly to thin the sauce. Serve drizzled over the slices of cake. I cut this cake into 24 slices (1/4, then each 1/4th into 6 very thin slices). When you have a piece, you will see why. It is incredibly rich. Oh and you can inform your low-carb friends that this cake has only ONE tablespoon of sugar and ONE tablespoon of flour in it.


3 comments:
wow sounds yummy. Sorry to say my baking days are about over. Pain, tiredness ect... Keep me from it. Hope some day to enjoy it at someones house? huggs Marion
Nikki,
I can't believe my eyes, a purple kitchen aid! Great job on the cake info for the newbies like me. Is your kitchen purple? I would love to see pix. Our kitchen still isn't done, but 2 finished baths and half a newly built one isn't bad. Like I need 3 baths for one kiddo... oh well, live and hopefully learn.
The kitchen isn't done, we are in the process of doing all the countertops in travertine, and whitewashing the oak cabinets. Tastefully neutral for eventual resale, LoL! Since the kitchen, living room, and dining area are one big square room, the cabinets hit you in the face right from the front door, even though they were on the back wall. Whitewashing them visually diminishes them.
We just added a shower to the garden tub in our bathroom, and I have to do the tile around it.
Tony came a couple weekends and rerouted the plumbing under the house, to move the washer and new water heater out onto the back screen porch. We are going to partition off part of it to make a laundry room out there so I can use the big back hallway for shelving, for bins for my yarn and fabric.
Then Tony says he wants to replace the dining area window with a door and drywall in the porch, to make a craft room for me. Always somethin'! LoL!
Post a Comment